We thank you for your question.
First, about the display of Disconnected / Connected.
This is actually the connection status with the Google API Client (which interacts with Wear and Google Fit).
In SIMTREK, the background service is connected to this Google API Client.
When this service is stopped, the status of the setting screen becomes Disconnected.
Is there any application on the smartphone that stops the service? (Like ASUS's Auto-start manager)
Next, the compass calculates the angle using the values read from the two sensors (Accelerometer, Magnetic Field).
Unfortunately we can not use compass in Wear where these two sensors are not equiped.
Also, if your wear is SONY SWR50, it seems there are times when it can not be read even if a sensor is equiped.
There is an example that it cured by updating the firmware of SWR50 to the latest,
Even so, there seems to be an example that it only cures for a short time.
(So we do not recommend updating the firmware ...)
Thank you for your cooperation.
Watchface SIMTREK
Showing disconnected at the top how do I connect and how do I get the compass to work?
Author: Conduits developer
Last update: 2017-09-06 09:37
what does disconnected mean
We so sorry to take long days to answer.
About the display of Disconnected / Connected.
This is actually the connection status with the Google API Client (which interacts with Wear and Google Fit).
In SIMTREK, the background service is connected to this Google API Client.
When this service is stopped, the status of the setting screen becomes Disconnected.
Thank you for your cooperation.
Author: Conduits developer
Last update: 2017-09-06 09:40
Why does the step counter not work with google fit
We so sorry to take long days to answer.
We added support for Google Fit, in SIMTREK version 1.0.10 (05/16 2017).
It supports Google Fit's - Step counter / Calories consumed (KCAL).
And its history graph.
Thank you for your cooperation.
Author: Conduits developer
Last update: 2017-09-06 09:45
How to use compass
How to switch compass mode in WEAR (Round face):
By tapping the lower left side of the face, the time display character part switches to compass angle display.
By tapping the time display character part in this state, the full screen switches to the compass screen.
From the compass screen, tap the top center of the screen to return to the original watch face.
How to switch compass mode in WEAR (Square face):
Tap [COMP] displayed in the face to switch to compass screen.
From the compass screen, tap the time display part at the top of the screen to return to the original watch face.
Settings in advance :
- (If necessary) Select the destination with the SIMTREK Configuration software on the smartphone.
In the SIMTREK Configuration software on the smartphone, press the [Select destination] button from the [Settings] - [Step count and distance] screen.
As the map is displayed, press and hold the point you want as the destination.
It will be completed if a message stating that the destination was registered is displayed. - When this destination information is notified to Wear by communication, the target arrow and the distance will be displayed on the compass screen of SIMTREK watch face.
About the operation of compass
The compass calculates the angle using the values read from the two sensors (Accelerometer, Magnetic Field).
Unfortunately we can not use compass in Wear where these two sensors are not equiped.
Also, if your wear is SONY SWR50, it seems there are times when it can not be read even if a sensor is equiped.
There is an example that it cured by updating the firmware of SWR50 to the latest,
Even so, there seems to be an example that it only cures for a short time.
(So we do not recommend updating the firmware ...)
Author: Conduits developer
Last update: 2017-09-12 04:21
How to use step counter
There are two modes of step counter, one using Android Wear built-in step counter and one displaying Google Fit contents.
In case of built-in pedometer for Android Wear, you can not use it unless the pedometer function is built in your wear.
When you connect to Google Fit you will be able to see the number of steps and calories burned (and their 12 hour history) of Google Fit.
How to connect to Google Fit:
- In the SIMTREK Configuration software on the smartphone, turn on the "Connect to Google Fit" switch from the [Settings] - [Step count and distance] screen.
- You will be asked to select a Google Account to connect to Google Fit, so please select your Google Account in Google Fit.
When connecting to Google Fit, you need to install Google Fit on your smartphone.
This is because we are inquiring about the number of steps and calories to the smartphone Google Fit.
Also, because of this, the display of steps / calories may be different from the display of Google Fit on the server.
How to switch to step counter mode (Round face):
By tapping the second lower left corner of the face, the time display character part switches to the step number display.
By tapping the time display character part in this state, the whole screen switches to the step history mode.
By tapping the step count history display mode, the right half and the left half of the screen, you can shift the time you want to see.
From the step count history display mode, tap the top center of the screen to return to the original watch face.
How to switch to step counter mode (Square face):
Operate the [STEP] column displayed in the screen.
By tapping the left half of the [STEP] field, you switch to Wear's steps - Google Fit's step count [FIT] - Google Fit's calorie consumption [KCAL] in turn.
Tap on the half of the [STEP] field to switch the entire screen to step count history display mode.
In step count history display mode, you can shift the time you want to reference by tapping the right half and the left half of the screen.
When you tap the clock display part at the top of the screen in step count history display mode, it returns to the original watch face.
Author: Conduits developer
Last update: 2017-09-12 04:51
Watchface SIMTREK » Others
Hello. How can i bring/connect the app on/with the smart watch? Its a samsung gear 2 neo? BR
Thank you for your question.
Simtrek watchface only supports Android Wear.
Samsung Gear 2 neo's OS is Tizen, so unfortunately Simtrek is not available.
We regret to inform you that we have not been satisfy your expection.
Author: Conduits developer
Last update: 2019-01-18 05:36
CASIO Style Real Calculator
Android App "Real Calculator" Manual PDF arrived.
Thank you for using our application. ![]()
We're sorry and thank you for your long waiting for manual about Android App "Real Calculator".
First of all, we have delivered the user guide first.
https://www.conduits.co.jp/calcbas/MAN300EN.PDF
Since the PDF file cannot be downloaded from the [FAQ] browser in the app, please copy and paste the above URL into the browser for reference.
We have released more described reference manual in other language, so please wait a few more weeks for the completion for our translation work to English.
(There are applox 70 pages in reference manual... So it takes time ![]() )
)
Author: Conduits developer
Last update: 2020-11-17 10:26
CASIO Style Real Calculator » How to use
Time Caclulations
Hours (H) Input : 5 digits.
Minutes (M) / Seconds (S) Input : 0 to 99. Values greater than 59 are automatically adjusted by addming to the hours/minutes.
Important: Time calculations are performed internally using decimal values.
| Key input | Display | Note | |
|
|
|
|
|
|
|
|
72S → ?H?S
|
[AC] 0 [HMS] [HMS] 72 [HMS]
|
0-01'12"
|
|
350M → ?H?S
|
[AC] 350 [÷] 60 [=] [HMS]
|
5-50'00"
|
|
|
[AC] 10 [HMS] 20 [HMS] 30 [HMS] [+]
8 [HMS] 40 [HMS] 25 [HMS]
[=]
|
10-20'30"
8-40'25"
19-00'55"
|
|
|
[AC] 2 [HMS] 30 [HMS] 40 [HMS] [-]
1 [HMS] [HMS] 30 [HMS]
[=]
|
2-30'40"
1-00'30"
1-30'10"
|
|
|
[AC] 9 [x]
7 [HMS] 30 [HMS][HMS]
[=]
|
9.00
7-30'00"
67.5
|
Author: Conduits developer
Last update: 2017-07-24 11:18
Tax calculation
Following example tax rate is 5%
| Key Input | Display | Note | |
|
[AC] 150 [TAX+] [TAX+] [TAX+] |
[TAX +] 157.5 TAX 7.5 [TAX +] 157.5 |
(Price-plus-tax) (Tax Only) (Price-plus-tax) |
|
[AC] 105 [TAX-] [TAX-] [TAX-] |
[TAX -] 100. [TAX] 5. [TAX -] 100. |
(Price-less-tax) (Tax Only) (Price-less-tax) |
Author: Conduits developer
Last update: 2017-07-24 11:19
Basic calculation
| Key Input | Display | Note | |
2 × (-3) = -6 |
Rounding Selector: [F] [AC] 6 [÷] 3 [×] 5 [+] 2.4 [-] 1 [=] 2 [x] 3 [+/-] [=] |
0. 11.4 -6. |
|
|
5 [÷] 3 [=] Rounding Selector: [F] Rounding Selector: [CUT], [2] Rounding Selector: [UP], [2] Rounding Selector: [5/4], [2] |
1.666666666 1.66 1.67 1.67 |
|
|
Rounding Selector: [CUT], [ADD2] 123 [+] 321 [-] 111 [+] 2 [.] [=] |
1.23 [+] 4.44 [-] 3.44 [+] 5.33 |
Author: Conduits developer
Last update: 2017-07-24 11:18
Basic calculation (2)
Author: Conduits developer
Last update: 2017-07-24 11:32
What to do if purchasing information is not reflected
First, We're sorry we let you spent your time.
Please try to do following operation on your device.
(At first, make sure you do not have multiple Google Accounts on your device.)
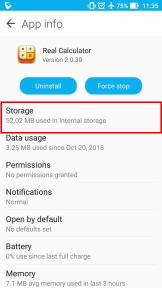
1. Clear the data of "Real Calculator" application.
By this operation, confirmation of purchase information can be surely generated at next startup.
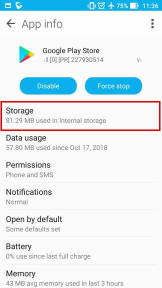
2. Clear the data of "Google Play Store"
Purchasing information is also cached in Google Play, so we need to erase this data as well.
3. Restart "Real Calculator" application.
We will confirm purchase information to Google Play in about 5 seconds.
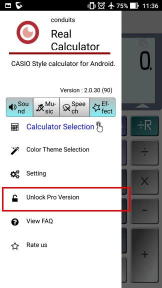
When purchase information can be confirmed, the item of [Unlock Pro Version] disappears from the menu.
If the screen does not change after waiting a few seconds, select the [Unlock Pro Version] menu again.
Information on the item is displayed. (Here again we are checking purchasing information to Google Play)
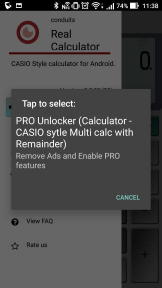
When you tap that item, the purchase transaction starts again, but purchase fails without fail.
You will not be charged again.
Items in [Unlock Pro Version] can be purchased only once.
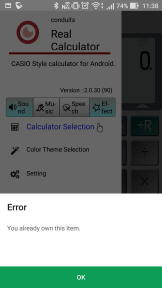
If purchasing progresses (please do not proceed!), please check the displayed Google Play account.
It may be different from the account that received the order number e-mail.
4. Terminate "Real Calculator" application and start it again.
After a few seconds from startup, confirmation of purchase information should be completed.
Author: Conduits developer
Last update: 2019-01-18 07:17